mardi 23 juillet 2024

Trion FPGAs

Getting started with the Trion FPGA.

For the past few days, I have been trying to operate a minimal Z80 system with the aim of implementing the entire logic part of the Drumulator in a TRION type FPGA.

I will spare you the details of the necessary 'acclimatization' to a new development environment, both hardware and software. As far as I am concerned, this stage is always long and tedious for me, which is why I have never been 'pushed to study', as they say back home. (This is not the only reason, but it is 'technically', the main pretext used for exclusion from the French school system).

So, it is absolutely necessary for me to understand what I am doing. I started from the base, namely a system just capable of producing the 'famous' Hello World of electronics, namely, the flashing of LEDs. A small 'complaint' on the Efinix dev board, it does not include the minimum amount of hardware capable of producing an 'intelligent' display. No digital displays, nor LCD: too bad. You must therefore make do with the 8 basic LEDs present on the circuit.

I will therefore reproduce the animation, but with only one LED lit at a time', supplied as a demo program with the board.

In order to test the concept a little in depth, I decided to implement the LED output register as a memory register AND standard IO type output. So I produced a 'quick & dirty' conditional code allowing me to test both implementations.

(the code of death)

Regarding the equivalent VHDL code to select the LED output either in memory register mode or in out mode in the I/O zone, simply modify the code selecting the LED output register like this:


Not very complicated either!

Oh good? And several days for that? Absolutely. I had made some clock synchronization errors which meant that at the default speed, high clock speed, the system could not operate. Obviously, I then had to carry out debugging by testing the entire operating chain of such a minimum system. I could have used internal debugging, but I have to say that the Efinity development software is not really well integrated. It does not offer a signal shape viewer like GTK WAVE to display the result of an execution. In a nutshell, I didn't want to spend time trying to get difficult-to-install external free tools to work. I could also have used the I/O ports on the dev board and plugged in a logic analyzer. I have a logic analyzer on PC, but I really don't like its interface at all. And overall, I support these Windows-based systems less and less.

Additionally, I also 'wasted' time trying to figure out the file format needed to fill the BRAM area used in ROM with the 'C' code binary. In fact, the file to produce is much simpler than the Efinix documentation suggests. As is often the case, they explain the internal workings of filling the BRAM, while taking care not to correlate the explanation with a real example. So, it's pretty easy to understand how this is supposed to work internally, but gives absolutely no information about how it relates to the real world. So, it's quite complicated to understand how to simply present the binary file. The typical kind of documentation provided by Microsoft: drowning the person looking for it under a mountain of doc that ultimately has nothing to do with the question. The result is simple, the graphical interfaces supplied with small development systems are no longer updated, or work in Windows 7 mode, as long as it works. Microsoft had already 'gunned' the small structures which provided even professional software solutions in DOS and Basic, at the beginning of the 90s. Microsoft is now euthanizing all the medium structures which still work (or still try to do so) with Windows. Great!

In the end: I obviously managed to make this minimal system based on Z80 work. The Efinity software also tells me that I can potentially make it work at more than 60MHz. So I tried to power all the logic directly with the 50MHz oscillator placed on the test board, and indeed, the result is completely functional.


A few seconds of illustration of how this first test works:


vendredi 12 juillet 2024

Trion FPGAs

And meanwhile...
I am testing new FPGAs, in this case the TRION family from Efinix.

Why venture into other FPGAs, when I have already worked with those from Altera (now Intel) and those from GoWin? Mainly for a question of cost and availability of 'small' footprints.

I really started testing the development chain only a few days ago and I must say that I am progressing quickly and easily. I had already studied the entire processor part of the Drumulator drum machine a few years ago. I implemented this part in Altera FPGAs, then GoWin in 2020, but I stopped this subject because of the shortage of components, then subsequently, the very significant increase in component prices, particularly that of FPGAs GoWin, which more than doubled.

And then, I recently discovered FPGAs from the Efinix brand and in particular the Trion family of FPGAs. Given the price of these circuits, I decided to resume studying the Drumulator. For this, I acquired a basic development board :


After installing the Efinity development software, I set about transcribing my VHDL source code to this new development tool. Its handling is not at all complicated and resembles the development software of other FPGA manufacturers, although simpler.


Although all windows can be floating, when you have a screen of sufficient size, the most practical thing is to have them all in the same window. The window 'modality' system used by Efinix can sometimes be quite annoying.

Nothing special for those who have a little mastery of VHDL, a language that I use mainly for writing code. The development board only contains a minimalist 'user' interface. A few LEDs and a few switches and that's it. It has no displays at all. So, it becomes a little complicated to test my Drumulator source. So I coded a driver allowing it to be sent to a serial interface, what the Drumulator should normally display on its four digits.

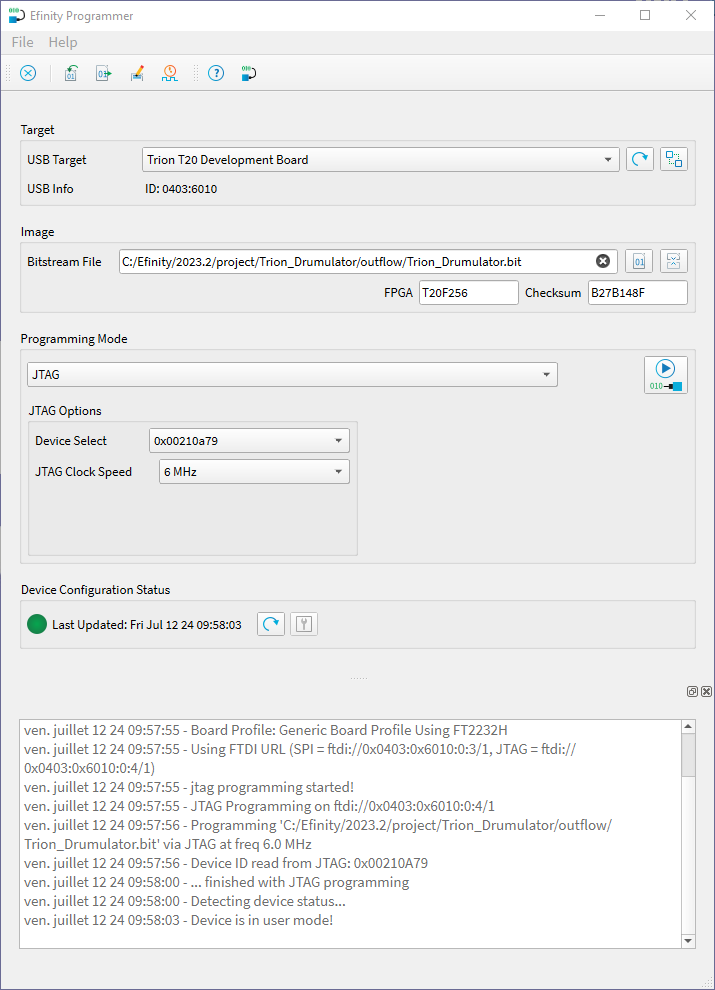
After some trial and error with the Efinity development software, I ended up obtaining a complete compilation of my source. All that remained was to test it on the development board.

But before that, you must install the USB drivers allowing programming of the FPGA. In fact, it is necessary to use the Zadig configurator in order to configure the two interfaces offered by the development board. The SPI interface and the JTAG interface.


'As they say', there is no reason why the installation of USB drivers should not work. And, normally, we must actually get the two drivers installed in the system.


At this stage, all that remains is to program the board with the generated code. For my first tests, I use JTAG programming, which allows the FPGA configuration memory to be directly programmed without touching the SPI interface and therefore without modifying the external configuration EEPROM. This allows you to find the demo code present when the board was delivered and therefore to check that it still works. We never know...


And there you have it, the whole procedure went well. Firstly, as I did not connect anything to the development board, I simply activated part of the LEDs with the memory zone selection signals, as well as creating, but externally to the Drumulator system, a low frequency blink clock for an LED. This will allow me to verify that at least the entire development.programming chain is functional, the traditional Hello World, in a way.


I developed a small expansion for the development board. The idea is to be able to test digital audio using boards recovered from an Akai digital recorder, as well as to test an HDMI type video output. These two topics are based on LVDS transmitters/receivers.

Otherwise, we can clearly see that the 'left' LEDs are lit. In fact, if you look closely, you can see that the one on the far left is slightly less bright than the others. This suits me well, this LED corresponds to access to the ROM of the Drumulator. It is therefore the most frequent access, which therefore represents a more intermittent ignition time, and therefore lower brightness.

And, what can't be seen in the picture, the LED on the far right is blinking slowly, indicating that the entire development chain is working.

Provisional conclusion: I am now sure that the entire development chain works, as well as the programming system of the development board. I also have strong presumptions about the functioning of the Drumulator core in this FPGA. I still have to connect a USB/serial adapter to my computer to check that I am receiving something when the board starts up.

I haven't coded the conversion of Drumulator segment type data to its ASCII character equivalent, so if it works, I will potentially receive anything, maybe even non-printable characters. It doesn't matter for the moment, the goal is already to see communication. And then it will be quite difficult to display anything else, given that I have not yet connected any switches to the heart of the  'Drumulator', I will not be able to generate any other information transmission. But hey, everything in its time...

lundi 1 juillet 2024

Just for fun?

It's been two to three years since I fully understood the 'democratic' operating (or dysfunctional) system of France. I know for example that, given my social class of origin which is totally foreign to the French bourgeoisie, and the way in which the oligarchy (the upper French bourgeois classes in power) has made the creation and exploitation of a viable business in France totally impossible for people not from the bourgeoisie, I know that it is totally impossible for me to 'succeed' professionally both as an employee and as an independent. This situation, absurd if we consider the collective aspect, leads to the economic results of France today as well as the result in the 2024 municipal elections in favor of the National Rally.

For decades I had felt that something was wrong in this country, but hey, to understand, you have to 'politicize' yourself. Which was not the case for me until recently.

Brief! However, it has been a very long time since I realized that what I was asked to do, within the framework of a job, did not correspond at all, neither to my real skills, nor to my desires. Reasons why I have always developed electronic projects privately. Lately I have even tried to insert myself into topics trying to promote my achievements and possibly market them. In vain. On this subject, however, I haven't really managed to understand yet. I have an idea, but I'm not sure.

By developing small electronic systems, I acquired some small skills. I am therefore going to implement them in what was my childhood dream: creating electronic devices dedicated to music. I have in stock an 8-way CV/GATE interface to be finished, as well as a MIDI connection system a little more adequate than the current MIDI network to be finished. So I'm going to devote myself to it.

And, since I have just repaired a Drumulator again, I like this machine and I have already prototyped pieces of it, I will start by trying to create a complete clone. I will put the progress of the project on this post.

Why the Drumulator?

My last repair dated 2024/06/30

Because it is a rather particular machine which, despite the theoretical simplicity of its operation, produces very good percussion sounds. This is because the sound production system is based on playing non-linear 8-bit samples. To simplify, it uses a particular coding that was used in analog telephone networks to artificially increase the audio quality of communications. Its 8-bit resolution thus increases to a 12-bit equivalent. Obviously, as the conversion cannot be linear, this gives a very 'punchy' but nevertheless very well defined rendering, perfect for percussive sounds.

Clone this machine, yes, but in a hardware way or in a software way?

In fact, I have already had the opportunity to develop the processor core of this machine in FPGA, as well as the wave sequencer. I did this on an Altera FPGA, then GoWin. I wanted to use Gowin FPGAs, but between the time I carried out my first tests and when I could have started producing a prototype, the price of Gowin FPGAs was multiplied by three!

At that time, about four five ago (2019), the price of a used, working Drumulator was around €250 in France. Which did not leave much room for the creation of a profitable machine from a financial point of view. The price of a Drumulator has now increased significantly, and is around  €700 ~ €800, leaving room for a clone.

https://fr.audiofanzine.com/bar/e-mu/Drumulator/

I also spotted FPGAs from another manufacturer whose characteristics are quite interesting and whose selling price corresponds to the development of equipment that must be sold at a reasonable price: the Trion family from Efinix


Obviously, moving from one FPGA family to another is not particularly trivial. Not because it involves changing the type of technology, but rather because it is 'yet' a leap into the unknown. When you 'habit' with a component, you navigate within your 'comfort zone'. Obviously, changing manufacturer means changing development software, physical constraints on the component itself, etc... We never do it lightly. But hey, at some point you have to go.

If I start this topic about an FPGA Drumulator, it's because I have already carried out some tests with the Efinity development software, from Efinix. And I know I can compile a complete Z80 system inside a Trion Fpga component.

But as of now, I have never actually programmed the study board I purchased.


For the moment, I have just implemented a Z80 core associated with the original Drumulator ROM in version 3.0. I have no means of display or input. I will therefore ensure that the message which should normally be displayed on the four digits of the Drumulator is displayed on my PC screen. To do this, I will just need to implement a system that translates the codes sent to the digit into a character string suitable for display on a terminal.

I will keep this principle subsequently, because I intend to dedicate the management of the front of the machine to a processor which will be connected by serial port to the FPGA.

So: attempt to activate the core of the Drumulator with display on the serial terminal of the 'famous' message "Bad"!

mardi 25 juin 2024

J'MSX : for the fun!

The weekend of June 23-24, 2024 took place in Paris, the meeting around the MSX standard:


the opportunity to meet around standard MSX and to compare our achievements with those of others.

I was also able to carry out some tests of my USB cartridge and found that it works well, except on the Panasonic FS-A1. The 48K cartridges seem not to want to launch after loading, although it works very well on my Omega and other machines.

So, I looked a little closer at this FS-A1 and noticed that its bios has some particularities which encourage some owners to replace it with a 'minimal' version. I will investigate this aspect, knowing that the cartridges which did not start on the Panasonic, work without problem on my Omega, without having touched it in the slightest, that is to say with the cartridge loaded with the ROM which did not start on the Panasonic!

Mr. Nishi was present at this MSX day. For those who don't know Mr. Nishi, he is the person who created the MSX standard with Mr Gates, in the early 80s.


No need to make introductions...


Mr. Nishi presented his MSX0 and MSX3 to us. 

So if I understood everything correctly, because I had never managed to understand what was going on since I saw articles on these machines, it would in fact be two machines based on the compiled MSX basic. Obviously these two machines offer an MSX compatible hardware environment, but based on an emulator.

Msx0 would be more specifically dedicated to IOT, while MSX3 would be adapted to computer learning. These two machines are therefore two somewhat dedicated hardware emulators based on a fast processor but I don't know what processor it is.

MSX0

MSX3

Well, until now I hadn't really understood the subject, and I was telling myself somewhere that I didn't really see the point of such a machine. Well now I know that these two machines are of absolutely no interest, sorry Mr. Nishi.

How to say, IOT is... dead! And learn computer science, in France, today, it's python, and that's all. so ok...

Nevertheless, I had the unspeakable honor of posing in the group photo with Mr. Nishi.

For me, the loop is complete. When I discovered microcomputers in the early 80s, people like Gates, Tramiel, Sinclair, Jobs, Woz and the others were simply geniuses and people living in a galaxy other than mine. I was fifteen years old and the future was just beautiful.

Obviously, since then, the reality here, in France, a small country with no future since a long time, my future has been completely different than the one imagined.

Come on, at least I feel like I was a little part of the story...


Those who know me will recognize me ;-)

Thanks to MSX Village for this very nice moment.

mercredi 29 mai 2024

PLC topic now...

I have just started a small activity at a French university. I deal with the subject of BMS for all university sites. In a country like France where everything, and more particularly the university, is supposed to be 'excellence', the reality on the ground is quite different.

Incompetence, inconsistency, significant salaries and resources dedicated to managers, and crumbs to field staff (classic stratification in France between the bourgeoisie and the proletariat). The result is that it malfunctions perfectly well!


But I digress...

However, one of the aspects that has never been taken into account in the development of a coherent BMS system is the maintenance of said system. With the advent of the standardization of Ethernet type networks and the rise in power of PLCs, PLCs with RJ45 connection have become widespread.

All operations can therefore be carried out via a computer connected to a network. As a result, the 'facilities' of real-time management of the PLCs have completely disappeared. Understand that these no longer have displays at all, as could be the case on dedicated systems, particularly for heating and ventilation regulation.

Yes, but, when you are in a substation on the roof or in the basement, not only has no network socket been installed, other than the one intended for the PLC, but obviously the wifi does not work.

Okay, so we need to add a small screen locally.

There are many screen solutions, but most of the time they offer services that go well beyond the simple need to query/modify a few parameters, and are available, inevitably, at fairly high prices.

A few years ago I studied the possibility of connecting a Nextion type screen to a PLC via an RS485 link in Modbus protocol. It worked perfectly.


The basic principle is simple, to make these screens usable in an automation environment, you must be able to power it with a voltage of up to 24V, you also need an RS485 link to communicate with the controller, and a 3.3V TTL link to control the screen.

I remember that I had carried out my tests with an Atmel AVR type processor. I gave up on this type of processor a long time ago. I don't like the way they are programmed at all and I don't even know if there are real-time debugging tools.

I have since switched to Chinese RISC-V processors which offer everything you need for comfortable work, at a very attractive price. So, I started here based on a CH32V203F8P6 processor.

I also rationalized the card by putting only the components strictly necessary for the type of application targeted.

This gives this type of achievement :


What do we find there?
  • Power supply up to 24V-DC.
  • A connector for an RS485 link.
  • A connector for the connection with the screen.
  • A connector for programming the processor.
And that's all.

For programming, this will be quite easy since the 'games' consist of interrogating the PLC in MODBUS to read or write a register, and updating the information on the screen or reading the information entered on the screen.

The processor used does not have large resources, but as it mainly involves managing only a few system parameters, this will be more than enough.

And, a few days later by post:


Nice little circuit, isn't it?

I just have to find the time to assemble one of these cards in order to carry out the first tests...

MSX show in Paris on June 22 & 23

It's been a few years now that, somewhat by chance, I became interested in the MSX standard that appeared in the early 80s. In fact, 'because' of Sergey Kiselev and the creation of his MSX2 compatible computer, the Omega :


Then, while trying to make this machine work, little by little, I got into its hardware and, through the forums, I met people interested in the same subject.

Since 2021, the year I really started to discover MSX, I have noticed that not only are there reference people on the subject in France, but also that the community is growing, slowly but surely. It's very encouraging.

So much so that this year, the association MO5, an association known in France for its work in conserving computer equipment, is organizing a meeting this year focused on the MSX standard with even the presence of Kazuhiko Nishi.


No, not Billy, the other person ;-)

Here is the information poster:


All information is available here: https://jmsx.mo5.com

mardi 7 mai 2024

EASY USB, a MSX cartridge dream!

Since the beginning of the development of the MSX cartridge, I have integrated the possibility of restarting the MSX computer once the cartridge has been loaded via the USB port.

However, this requires making a small modification inside the computer. Nothing very dangerous since you have to connect a link coming from the cartridge to the RESET system of the computer. I personally installed a banana plug on the case of my MSX OMEGA into which I plug the reset signal coming from the cartridge.

However, not all MSX machine owners feel comfortable making this modification. The question that was then asked to me was whether it was possible to make an electrical outlet controlled directly by the cartridge. Yes of course.

To maximize safety of use, however, there was no question of directly connecting the cartridge to a switching system. I opted for a radio link with the use of small, low-cost modules, specially designed for this type of application.

Obviously, this requires manufacturing a small autonomous electronic system. So here is this system:


Quite simply!

I didn't make the 3D print of the little transformer that I ended up finding. 

But it gives an idea of what the final circuit will look like. A transformer transforms the mains current into 6Vac, rectified then filtered and regulated to 5V for the RF module and the two relay control transistors. Two transistor protection diodes are also installed.

Note that I inserted two relays for the two sector conductors. In this way, when the socket is placed in OFF, we will be sure that the devices connected to this socket will be completely removed from the electrical network.