The µPF--2
mercredi 30 juin 2021
Time for the µPF--2
mardi 29 juin 2021
A SMALL MIDI TOOL!
A few days after having ordered the realization of my printed circuit board, it has just arrived:
A very easy to assemble midi merge box
Unlike usual, I chose not to use SMD components but only through hole components. This will make it easier to assemble the circuit. I could even offer the circuit to be assembled as a kit if that interests some...
I am still waiting for the components, especially the switches and connectors, to carry out the first tests.
mardi 15 juin 2021
A SMALL MIDI TOOL!
A midi merge box
- Current synthesizers are now often equipped with software allowing their setting from a PC / MAC.
- For those who prefer hardware sound generators rather than software, the number of machines to be controlled tends to increase over the years.
- The topology of the MIDI network is not efficient when it is necessary to connect several MIDI out to a single MIDI in.
- Several solutions are available to overcome this problem but often it does not work well but still costs a 'certain' price.
jeudi 10 juin 2021
RETRO ][ : A Retro Apple 2
The adventure goes on. After having assembled an Omega MSX2 computer, an Easy Z80 under CP / M and a Maximite under Basic, this time I am attacking a clone of APPLE2, the RETRO] [ :
 |
| https://www.hackster.io/news/capture-apple-nostalgia-with-the-retro-computer-f0fc0ffda886 |
After starting by mounting the power supply, I actually noticed a problem with the two negative voltages of -12V and -5V.
Both of these power supplies have a small design error. Nothing very bad but this implies on the one hand not to mount the two regulators concerned, as can be seen on the previous picture, and on the other hand to make the corrections to the printed circuit board.
This considered, nothing prevents continuing to build what will ultimately only be a prototype since a final version involves making corrections :
New PSU for the PROPHET-VS
The Sequential Circuits Prophet VS is a great synthesizer :
But it is also a machine that is not very well made. Poor quality components, perfectible printed circuits, spreading out of the processor buses inside the device, a PSU that heats up a lot, a very noisy transformer and above all a whole series of very poor quality connectors. Not to mention the 'famous' CEM5530 whose production at the time must be completely out of service today, reason why I had to develop a replacement clone years ago.
The copy I own has only really worked for a few years, after making a lot of changes. And yet, there would be more to do. And precisely, one of the really painful things in this machine, when it works and that one can use it, it is the very important noise which the power transformer generates: very boring.
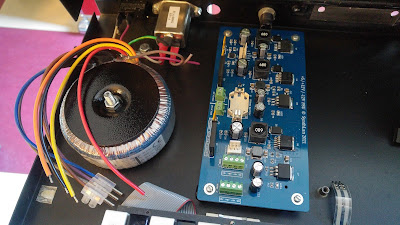
So, I decided to replace the whole power system of this VS. There were several possible choices for creating a replacement PSU. I decided to create a generic power supply that can be used in other devices, and secure, without handling high voltages.
I created a low voltage switching power supply with linear regulators on the + 12V and -12V outputs:
 |
| Beta version. |
Output technical details:
- +5V 2A (switching)
- +12V 2A (switching + linear)
- -12V 2A (switching + linear)
- RESET signal
- /RESET signal
- +5V BATTERY
- Power Error indicator
- Floppy type power connector
- 2 x 18V/AC
- Thermal fuses
- Precise outputs
- Low heat dissipation in normal use
I have to admit that it took me several versions to sort out the little issues that I encountered and thus obtain a very reliable and convenient power supply. To install this new PSU, the first thing to do was to remove all the concerned components on the Prophet motherboard:
In my case, I also removed the memory backup battery because I equipped my Prophet with self-backed SRAMs. This avoids any possibility of problem due to a possible corrosion of the battery body which could cause serious damage to the printed circuit:
Funny: the three green LEDs of the PSU illuminate the printed circuit board of the front face, which has the effect of nimbling the 'Enter' and 'Edit Waveform' switches with a green hallo.


