lundi 20 janvier 2025

EMU 1 : a small step

At the moment, I'm still stuck on what I think is the main problem, which is a supposed malfunction of the SIO/2 which manages data writing and reading from the floppy disk drive.


The SIO has two serial ports numbered #0 and #1.

So I created a small monitor for the EMU1 mother board from port #1 of the SIO, allowing me to run the RAM test, because the EMU1 has an original serial output available for external communication with a computer.

I had a lot of difficulties making this monitor. But, after a while, it ended up working on port #1 of the board's original SIO/2. 

Then, I tried to make this monitor work with an SIO/2 which I assumed was fully functional. I never managed to get anything. Hence the doubt about the functioning of this other SIO/2.

In fact, I ordered five more SIO/2s, directly from a supplier in China. Supplier from whom I sometimes order unobtainable components, and with whom I have never had a problem.

So I tested my monitor with these five new SIO/2s. I never managed to get anything. And the EMU board didn't show any more signs of working when I booted it with the stock OS. Hence, once again, the doubt about these five new circuits.

Result: I went in two directions simultaneously. The first to consist of purchasing two SIO/2 again, from Germany this time, then creating a small adapter board allowing a SIO/2 to operate in place of a SIO/0. The difference between these two components is minimal and consists of just two or three port #1 pins to rearrange. There is no differences in software.

The adaptation circuit that I sent to be made:


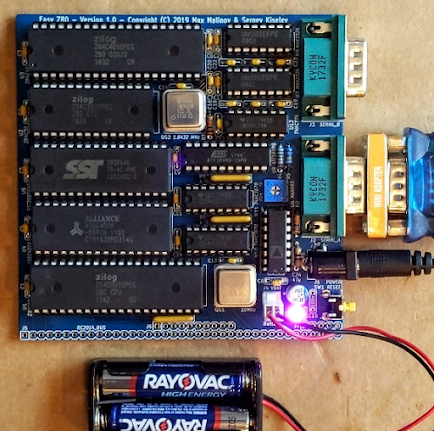
I actually intend to use a small computer board under CP/M 80 which has a SIO/0 in order to test the operation of the two ports of all the SIO/2s in my possession. This is the Easy Z80 board created by Sergey Kiselev and available on his github repository: https://github.com/skiselev/easy_z80


I built this board in 2021. Since then, the RomWBW ROM has gone from version 3.0.1 to version 3.4.0, with the possibility of swapping the monitor's communication port using the simple command "i 1 115200" for example. I told myself that I had a perfect system for testing my SIO/2s.

First of all, I updated the ROM of this little system, and tested the controls with the original SIO/0 circuit. And indeed, at startup, I have communication with port #0 of the SIO, then after launching the command, communication goes to port #1. This part being validated, I therefore inserted the SIO/2 to SIO/0 adapter on this Z80 board and started my communication tests again.

My Easy-Z80 with an SIO/2 on my adapter.


Eazy-Z80 currently on port #0 asking for going to port #1


Easy-Z80, communication established on port #1

And there: amazement!
All SIO/2s in my possession, other than the original one on the EMU1 board, work. Which embarrassed me. This means that there is a problem, either in the initialization of the SIO which I do in my monitor program, but then, why it works very well with port #1 of the original SIO/2? Or there has an electronic problem on the EMU1 board, which I cannot determine. And again, why does this work with the original SIO/2?

On the other hand, and this is very good news, I was able to notice that on the Easy Z80 board, the original SIO/2 whose port #1 works very well on the EMU1 board, does not work correctly, in any case on its port #0. The transmission goes without problem, I get the board's monitor pattern every time I perform a RESET of the board. On the other hand, I only receive characters very rarely, and when it goes well, it is only a few characters maximum and only on the condition that the board has just been put back under power. In fact I got exactly the same result when I coded my monitor program not to work with port #1, but with port #0. 

So, there, I can now conclude that the original SIO/2 of the EMU1 is not working correctly and, in its current state, is in any case incapable of receiving information from the floppy disk :The TX function of port #0 therefore seems to work normally, however the RX function only works a few seconds after powering up. That's already a good point.

The second thing now is to try to understand why none of the functional SIO/2s are able to provide me with access to the monitor that I programmed for the EMU1 board. Signals problem or problem in my code?

I feel that the origin of the problem may not be easy to determine...

Small remark about the Easy Z80 board. I am completely surprised that RomWBW is still maintained and even improved four years after creating this little system. It's actually quite cool to see this board working in a terminal on my PC. Guaranteed vintage feeling...

vendredi 3 janvier 2025

EMU 1 : the saga continues

For some time now, and following all the tests that I have been able to carry out on the EMU 1 motherboard, I have come to the conclusion that I 'must' have a problem with the circuit Zilog SIO/2 serial interface, in other words an 8442 type circuit.

Obviously, I haven't been doing nothing for the entire time since my last post on the subject. I ordered five circuits directly in China from a supplier in whom I have relatively good confidence.

After a few days of waiting, I received my five circuits.


I was quite excited upon receiving these circuits and couldn't resist trying them 'right away' on the EMU 1 motherboard.

Hallo what?!!! Impossible to have the test menu on screen which nevertheless works very well with the original SIO/2 component.

Looking carefully at the logo engraved on the new circuits, I really wonder if they are not fakes!

I don't have the means to resolve the doubt at the moment. I would need a machine using a SIO/2 circuit to check their operation. Exactly, I have one. This is a montage created by Sergey Kiselev, who is called Easy_z80 and which is located at this address: https://github.com/skiselev/easy_z80

Unfortunately, this system uses not an SIO/2, but an SIO/0. The difference? Communications port #2 is not wired the same way. Nothing very complicated in fact, the TX and RX clock is on the same pin on the SIO/0 while on the SIO/2 the clock arrives on two different pins, which allows for a different communication speed in transmission and reception. In addition, the receive pin arrives on pin 29 of the SIO/2 while it is pin 28 on the SIO/0.

The result of this is that I cannot test a SIO/2 on the Easy_Z80 board either!

Impossible to dispel doubt about the functioning of the circuits, and therefore the motherboard of the EMU 1. What a 'mess'!

So I opted for two actions. On the one hand I ordered a set of two other SIO/2s on eBay, but this time in Germany and supposedly coming from an NOS! I also developed a small adapter to allow the use of either an SIO/0 type circuit on the EMU 1 card, or an SIO/2 on the Easy_Z80 system card.


With this adapter, I will at least be able to test the operation of my SIO/2 on the Easy_Z80 card, knowing that Easy_Z80 works very well with the SIO/0 with which it is equipped.

As you can see on the Easy_Z80 card, the SIO is indeed an 8440, a SIO/0 therefore:


I will be able to test the SIO/2 with my adapter, knowing that the two serial ports are used as simple asynchronous communication ports. The /SYNCA and /SYNCB signals are not used, which therefore allows the use of an SIO/2 instead of an SIO/0.

Likewise, these signals are not used on the EMU 1 motherboard. An SIO/0 can therefore be used instead of an SIO/2, with the adapter I made.

The continuation after the next experiments...

jeudi 19 décembre 2024

Drumulator and Efinix FPGA.

A month after my last publication on the subject, a little progress...

And yes, I spent a lot of time on the EMU1 motherboard which, if it still doesn't work, gave me a lot of its secrets which will hopefully allow me to make it work again!

I am therefore resuming the implementation of the Drumulator in an FPGA. This time I test the small simulation board of the machine control panel.

In fact, I have a few issues that I didn't expect with this FPGA. Certainly, its cost is affordable compared to other offers on the market. But I discovered a pretty significant limitation of the implementation of these Efinix FPGAs.

In principle, it is of course possible to do the same thing as any other FPGA with the Efinix Trion range, except that...

It's not that simple. The internal resources are not as flexible as what you can find on other components, which means you have to rethink your way of doing things somewhat..

Basically, asynchronism is not the strong point of these circuits. Well, you will tell me that when we do FPGA, it is not to do asynchronous. Yes... or no. Actually it depends...

Well with the Trion range, the question does not arise : it's 'nyet, tovarishch' !

Once it is well integrated, you just have to review the design. And to validate my 'new' approach, I simply coded a basic Z80 system, accompanied by a very small program allowing me to test the display of the front panel of the Drumulator :


Which allows me to validate not only my way of doing things synchronously now, but also the functioning of the display system.

I can now get back to studying the CTC equipping the Drumulator and conductor of the entire machine.

The next goal is to obtain the same display directly from the Drumulator environment, that is to say with not only the CTC programmed in VHDL, but also the entire generation and reading of the interrupt vector, as well as than his acquittal. I admit that this whole vectorized IRQ system of the Z80 is still a 'happy mess' ;-)

I have (unfortunately) been working again for a few months in national education. Which leaves me less time to do electronics. I still hope to be able to make significant progress on the subject in the coming weeks...

mercredi 11 décembre 2024

EMU 1 : Finally a first hope?

Same title as the previous post? Indeed, the chain of discoveries continues...

In fact, after discovering a faulty memory component and replacing it, I found that the EMU1 boot process still would not initialize.

What to do then? To get to this point, I set up a serial communication with a PC using port B of the SIO component. It is port A of this component that manages access to the floppy drive. So I considered that this SIO was fully functional since I had no problems with this serial connection.

Not really knowing what to do anymore, I then decided to test port A of this SIO by programming it exactly the same way as port B. The Emu1 schematic means that in fact, it is the same clock speed that drives the writing to the floppy drive. Happy coincidence. So, I have absolutely nothing to change in my code, except just the access addresses to port A.

And then there: surprise!

I had a lot of trouble getting characters to display on the screen. As for getting strings to display: impossible. So I ran a whole series of tests to try to figure out what might be going on.

The conclusions are as follows: When powering up, more than 90% of the time I do not have the characters displayed. And above all, reading the status register seems to pose real problems.

Even though the character was emitted, the empty transmit register bit is never set. So my test program crashes on this, and I can't emit a complete character string.

So: I think the original SIO on the EMU1 board has a malfunctioning port A. Which fits perfectly with the current state of the board that won't boot at all. I have another SIO that I've never gotten anything to output. I assumed it was fine. I've done a lot of testing with it, which has led me to a bunch of wrong assumptions.

What now? I can't really move forward on this. I absolutely need to find some working 8442 type SIO circuits to check if the current state of my assumptions is correct or not!

The hunt for 8442 is on...


Come on, I ordered 5 SIO2 8442 circuits. I just have to wait for them to resume testing...


mardi 10 décembre 2024

EMU 1 : Finally a first hope?

Since my last post, I have finalized the EMU1 motherboard DRAM test program.

The problem that arose when testing a 64KB bank and then the other 64KB bank was the management of the variables of my small application. Indeed, by switching banks, we completely lose the contents of variables, which can only crash the program.

How to do it then? One possible answer might be: no global variables to avoid fixed references, use the stack, and switch banks only from the main loop, never in a subroutine.

This way, you can use as many variables as you want, and the stack pointer is necessarily at its origin when you are at the highest point in the program: easy!

And that's how I was able to complete my program, and then test it with two DRAM circuits removed from the board.


I set up a small menu to launch the test, then to choose which bank to test. And on the terminal output, we can clearly see the two missing circuits, which therefore generate two errors.

If we look at how the memory circuits are placed on the motherboard, we have this:


Which corresponds to the following logical organization:


I could have clearly indicated the address where the errors are found but converting from numbers to hex strings takes a lot of resources, in the little program space available, less than 1KB, it is impossible to implement. So, I simply indicate in which 16K segment the defective memory component is located.

If I take the example above, where the indication was RAS2/RAS6, knowing that I had previously selected bank no. 1, I know exactly where the faulty circuit is located.

And that in addition the crash occurs with the processing of 0xAA, I only have to target the four circuits corresponding to the '1' of 0xAA, that is: 0b10101010, or bits 1, 3, 5, 7.

Obviously, if there are more bits in error, this will involve testing all 8 circuits that make up the 16KB segment. But hey, it's already much more practical than just knowing that there is a problem on one of the banks...

So what, you ask? Apparently, I am now able to determine that there is no RAM problem, in fact. Because when I put the two circuits back in place, obviously, I no longer had any errors. Yes, except that...

That's when I decided to configure my program to test absolutely all memory addresses. To do this, I placed the memory stack at the minimum possible RAM space according to the number of bytes needed for my program. In fact, by successive tests, I placed the stack one byte above the value where the program crashes, at 0x040C. As a reminder, the first 0x0400 addresses are those of the ROM. The RAM therefore starts at 0x0400, and I placed the stack 12 bytes higher. Then, I configured the RAM scan to start just above the stack, at 0x040D.

And what do you think happened?


I have several bits in error on the RAS4 segment, since if you run the entire test, you see that I had first performed the test on bank 0 which had not generated any errors, then I selected bank n°1 to relaunch the test which generated these errors.

In fact, and as I was in the process of writing my program, I was able to test the RAM by starting the scan at different addresses. What I determined is that at 0x040E, I have the problem with 0x55 and that at 0x040F I have the problem with 0xAA. I am not able to know if it is the same component that is causing the problem. I am obliged to test the 8 circuits.

On the other hand, I don't know where the EMU program is stored, in bank 0 or 1. I also don't know how the two banks are used by EMU. At 27KHz, and given for 2 seconds of sampling, it seems obvious that only 64Ko are used for sound reproduction, and not 128K. In any case, if the EMU1 program is stored from the base of RAM in bank 1, then there is a guaranteed crash.

At least for the first time, I have a small lead to follow for the resolution of the machine startup problem. In addition, I am pretty sure that the CTC, the SIO and the PIO fulfill their function since to be able to communicate by serial link, I was forced to program these three circuits. And their operation corresponds to what was expected. I should also add that I also tested all the RAM circuits using a small DRAM tester of this type :


As for the EPROM programmer used in component test mode that did not detect a faulty 74ls00, would I be a victim of the same tool reliability problem? Hmm...

So....

vendredi 6 décembre 2024

EMU 1 : Finally a 'real' first program!

Of course, this may raise a smile, but it wasn't easy to get there!


This allowed me to verify that the serial interface was working in both directions, as well as that there were no errors on the first 64KB bank of RAM.

I still have to check the second bank. I don't know how to do it at the moment, since it will be necessary to do bank switching, otherwise my program will crash miserably.

mardi 3 décembre 2024

EMU 1 : Second attempt to write a program for the EMU1 motherboard

I think I finally found the problem of adapting the EPROM emulator. It must be said that it is not particularly easy to adapt an emulator that can only emulate at least a 2764 EPROM on a system designed for a 2708 EPROM!

This is not a problem with my EPROM adapter addressing, but with how the EPROM emulator works internally. For a 2764, it is absolutely necessary to send it 8KB of data otherwise, part of the code is simply not available at the output of the EPROM Emulator.


The usual little loop of sending strings through the serial port. This time the message is big enough to crash the system, but it seems to work.

It took several steps to be able to start working correctly with this EMU1 motherboard!

Well, tomorrow I'm programming the character reception in order to try to lay the foundations of a micro debugging system. I hope that what I've modified about the EPROM emulator will confirm the validity of my approach of today...