lundi 26 juin 2023

A downloadable MSX cartridge.

After having studied a universal timer based on the operation of the TMS1122, and while waiting to receive the printed circuits board of the definitive version, it is time to continue the study of the MSX cartridge.

The reasons for this type of cartridge: I knew absolutely nothing about the MSX stadard. Out of curiosity, I mounted an MSX board developed by Sergey Kiselev :

https://github.com/skiselev/omega/blob/master/Mainboard.md

This MSX computer works very well. However, the problems started when I wanted to test an application, typically a game. Which cartridge to insert since I don't own any original game cartridge?...

I tested several 'universal' cartridges like the Carnivore 2 witch was defective, the Rookie Drive NX which is supposed to emulate a floppy drive and the MegaFlashROM which is the one I managed to use. 


The common point of these cartridges is that they are not at all easy to use. Most of the time, it's a matter of copying the desired program to an SD card and then inserting this SD card into the cartridge. When starting the computer, it is then necessary to press keys at certain times to access the menu of the cartridge, allowing the program of the SD card to be recognized by the MSX computer, most often by copying the contents of this SD card in a memory space addressed by the MSX computer. It works, but it's anything but practical. And to consider development, it's downright impractical, hence the presence of MSX emulators for Windows for example.

So, I decided to try creating a cartridge that would work like a memory emulator. That is to say that the memory of the cartridge could be loaded from a PC and directly accessible by the MSX computer after RESET. Simple in fact!

Note that with this project, I have no idea where I'm going. I have never programmed the USB interface of the processor used (always RISC V). My experience with USB dates back a few years when I created a MIDI multiport using an STM32 processor. For now, I have created an MSX cartridge and have just implemented the few components needed to make the microcontroller work.


This is the 3D representation of my cartridge and...


This is the hardware realization with just the necessary components to go on the adventure. The first step will consist in programming the microcontroller to behave like a mass memory then to use part of the internal SRAM as memory accessible by the PC.

This is already a nice challenge I think...


vendredi 31 mars 2023

Retro-computing : TMS1122NL

Until today, I used to post topics in no particular order. As a result, a project was sometimes scattered over long periods of time on this blog, except for my repair of the Korg T1.

I published on Facebook a few days ago a photo taken of a printed circuit board that I intend to emulate one of the first microcontrollers, namely the TMS1122, a circuit from the 4-bit TMS1000 family from Texas Instruments.

I was asked if I had a blog on the development of this circuit in order to follow the construction. Hence my decision to make dedicated articles. I will see in time if it suits the form of this blog.

So :

- 03/31-2023 'A small project around the TMS1122'.
- 05/05-2023 'What... since the last publication'.
- 06/07-2023 'What... since the last publication'. 
- 06/18-2023 'The prototype is approuved'. 

A small project around the TMS1122

Why such a project?
In fact, a very long time ago, I made a device around this circuit. It was in fact my first 'processor' based achievement, in 1983. I was so impressed by this system that I kept very good memories of it and the desire to use again the same concept for years.

But what does this TMS1122 do? 
It is quite simply a 4-output weekly programmable clock.
And that's all?
Yes, but he does it very well. Its simplicity of use is disconcerting.

Let's go, what can such a clock look like?


The image is taken from a scan of a French magazine: Electronique Pratique. It is this clock that I also made and used for years: not very sexy!

Presented like this, we realize that the device is quite bulky. We also note that the front panel has many keys plus LEDs and 7-digit displays. The 4 outputs are available on the rear face to supply power (mains) to 4 devices.

Aspects that I find a little annoying: the size; the obligation to connect the 4 devices directly to the clock case without the possibility of a remote control; the display that does not manage the seconds. This last point is important because it can be interesting to put a device in operation for only a few seconds.

The interesting aspects: a clearly readable, simple display which indicates absolutely all the necessary information. A sufficient number of buttons to manage the device without having a headache, even without instructions.

The goal of my realization is therefore to reproduce this clock but by removing the disadvantages and adding the functionalities that I think are absolutely necessary.

Of course, the TMS1122NL is no longer available today. And anyway I could not use it since it does not have the management of seconds, which I absolutely want to implement. Incredible, according to WikipediA information, about 26 million of these circuits, TMS 1000, were sold by T.I. per year, from 1974 to 1979, or 130 million! The TMS1122 being a TMS1000 version programmed to be this famous 4-output clock.

TMS1122NL, the brave!

This raises the question of processor emulation, or application emulation. In fact the question does not really arise. Even if I emulated the processor, since I don't own the application binary because it is factory-written in the circuit, I couldn't run this binary anyway. (Or else, help from a veteran of T.I. who would have the binary in question...)

It is therefore a question of recreating the operation of this TMS1122 programmed to be a clock, on a totally different system. Consequently, the question of the choice of micro-controller arises. There are a multitude of possibilities, in particular the circuits of the ARM type, which I use regularly, or others... I've used many different types all these years. This time, I decided to try the adventure on a relatively new type of processor, namely a RISC-V, In this case, a CH32V203C8T6 from WCH. It's trendy, I know...


Without further ado, here is a three-dimensional view of what I will try to achieve and make it work:


As you can see, the size of this circuit is much smaller than the bulky machine presented at the beginning of the article. Also, there only seem to be two ICs on this design. And you are not wrong. No transistors or other logic circuits either. In fact, the small integrated circuit is an integrated real-time clock. So apart from the processor and the clock circuit, there is no other active circuit on this circuit board. Compared to the original TMS1122 design, will it work?

The original design, provided by T.I.


My design:


My schematic is very different but it contains all the elements of the original application as proposed by Texas Instruments. All switches, LEDs and displays are present. And here, not only 4 7-segment displays, but 6 since it is planned to display the seconds.

At this point, I don't know if this schema is valid. I don't even know if I wired the right signals for programming the processor. I did some tests with a study board that I previously purchased, but despite the fact that I managed to program the processor of this study board the same as what I plan to do here, a doubt remains, which I have not been able to dispel with the documentation. I'll see...

A few days later!

First I mounted the whole board. I started with the processor to verify that I could access it using the programming dongle and the development environment. It has been. So I placed the rest of the components, and this is what it looks like:


On the other hand, what I had anticipated about the programming pins of the processor turned out. I use some inputs / outputs of the processor to control elements, LEDs, buttons. However, some outputs used are also dedicated to the debug port. It is therefore necessary to deactivate this function within the processor to be able to use these I/O as such. In doing so, the possibility of placing the processor in debug mode using the external dongle is deactivated. So I had to connect two switches to the board to put the processor in the right mode using a hardware RESET.
This is the reason for the 4 wires soldered to the board.

Programming the system is not very easy. To simplify the hardware to the extreme, I used very few components, so no buffers, no transistors etc... I also routed the board so that the tracks are the easiest to route, with a minimum of vias.

All this implies that everything must be managed by software. So it took me some time and some headaches. Because in fact I was also discovering this processor. The development environment does not have a graphical interface like that of STmicro to configure the hardware resources of the processor. Everything has to be done 'by hand'. On the other hand, and thanks to the many examples provided, this way of doing things allows you to know very precisely how the processor works, which is not necessarily the case when everything is 'hidden by a nice graphical interface.

Where am I today?

Well, all inputs/outputs are functional. Communication with the real-time clock works well, but it was no fun hand-programming a half-duplex SPI port on a single I/O. Basically, the SPI bus of the processor always uses two distinct I/O. The management of the keyboard works very well, which was not necessarily the case with the TMS1122 or the bounce of the switch contacts was not correctly treated: many false bounces and therefore a somewhat delicate entry of information. I also finished the behavior of the system when entering information.

It now remains for me to create the command interpreter which will have to execute either the orders directly, or place them in the database. Then to realize the scheduler of the database, which will be responsible for the realization of the programmed actions.

On to the next post...

> 05/05-2023 < What has been achieved since the last publication.

Well, database management has been completed. All the functions necessary for the final construction of the program are now established. There will probably some modifications to be made because during development, I realized that I could make some operational improvements.

I also made a front face for this application. I just received it. I must say that for a test shot, the rendering is quite correct:


I still have to find a plastic film to improve the contrast of the LED displays.

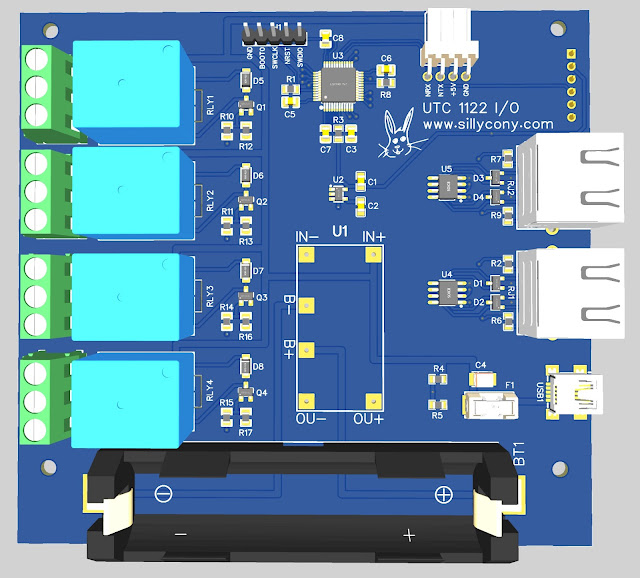
In order to keep the project small, I split the construction into two parts. The first, the one presented to you, manages the user interface as well as all the functions of the clock. However, neither the power supply nor the inputs/outputs are present. This is the subject of the second part of this clock, here:


This part will mount directly to the back of the main board. It contains everything you need for a backed up power supply as well as different types of I/O including the 'famous' relays present on the original TI concept. I added some specific inputs/outputs to make this part of the construction as flexible as possible.

I also think I can use this part in a different implementation of the TMS1122 concept, I think using a graphic display.

What remains to do to 'practically' finalize this project: the re-writing of the firmware in a stable version, the actual realization of the I/O board and its test. It still represents work.

> 06/07-2023 < What has been achieved since the last publication.


Well, I rewrote the entire system program. Indeed, the first draft consisted in checking the software feasibility corresponding to the hardware options that I had implemented.

Once this verification was validated, I first had to improve the sub-parts corresponding to the various hardware implementations. On the other hand, I also modified the general functioning, namely that absolutely everything that happens is managed by interrupts and no longer in a main loop reacting to various semaphores coming from multiple interrupts. Finally, I also added some features that are not original in the TMS1121/1122 in order to improve the general workflow.

I just have to check the general operation of the system and correct any bugs. But it will now be much simpler with the new software architecture.

In addition, I received the power supply/relay board as well as the screws necessary for the general assembly. I have not yet tested the power supply board but have already assembled the assembly to check if all the dimensions were respected.

It fits very fine :


I had planned to mount it in a Euro Rack type box. This type of rack is elegant and highlights the general appearance of the TIMER, here next to a Behringer module. Of course, in the case of mounting near a PLC box, this Timer can be mounted in a specific box.

I placed a few too many screws for my taste. I still have to check if the keyboard works as well with fewer fixing points. I also have the screen printing to be improved. All these adjustments will be made on the final version which I hope will be available within a few weeks.

I am also testing the power/driver board. It attaches to the back of the Timer board. Here is what the final assembly looks like:


The Timer is designed to work for a certain time, even in the event of a power cut. This board will also eventually receive some serial links to allow the Timer to communicate with different peripherals. I plan this for a future version. I only assembled some of the components because it is only a prototype for the moment. Everything seems to be working fine...

Even if it is a relatively simple project, I admit that it still takes time when you want to do well and you have to manage all the aspects of such a project. But hey, that's also what's interesting...

> 06/18-2023 < The prototype is approuved!


The two-way communication between the clock card and the input/output card works perfectly well. I can now check the battery status directly on the front panel.


About battery, the whole system is able to run at least three whole days on the 16550 battery, relays not activated in this case. Which is more than enough for 'normal' use of this type of equipment. From memory, the original version, equipped with the famous TMS1122NL, was just able to run about a day with two 4.5V flat batteries in series, and even then, on condition of turning off the clock displays. Whereas in the case of this new version, the displays constantly show the time.

It only remains for me to make the few adjustments that I think should be made on the printed circuit boards as well as on the front face to propose the final version of this clock.

As a reminder, this clock is extremely easy to use and in the current version, offers 4 programmable outputs over the week. 40 program steps are available, which doubles the capacity of the original TMS1122NL based clock. Once this device is really finished, I plan to study various extensions that seem interesting to me to integrate, such as temperature control and other kind of measures ...


vendredi 24 mars 2023

For TEST : a downloadable MSX cartridge

In the 1980s, there were several families of computers. Among these was the family of MSX machines. The interest of the MSX was that it was an open standard allowing the manufacture of compatible machines by a certain number of manufacturers.
This type of computer has not been used for a long time, but remains a very good gaming platform. Msx is now trying to evolve, especially with the MSX-3 initiative, but I'm not a fan of this evolution.

So, and in order to facilitate the development of applications under MSX/MSX2/MSX2+, I am trying to create a cartridge that can be downloaded from 'PC' via the USB bus.

here's what it might look like:


mardi 28 février 2023

MSX Omega board : first game!

Difficult start to the year. I haven't published much in 2023. But here's a little new that delights me: I was finally able to launch and play a game with my Omega board.

The Omega board :


I didn't have a keyboard at the time, and given the cost of building this board, I decided to use a standard USB keyboard. So I made an adapter to connect a cheap commercial keyboard to the Omega:


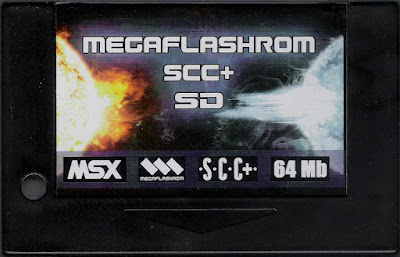
The results of using this adapter were satisfying, but I didn't know why I couldn't use the Omega board correctly. And then someone gave me a new BIOS that was visibly better suited. From that moment, I was able to use the MEGAFLASHROM SCC+ SD cartridge to install the Galaga game on it.

Why Galaga? because a user of my USB keyboard adapter project (https://github.com/sillycony/USB-keyboard-to-OMEGA-converter) told me some problems with Galaga. So I solved these problems and tried this game with my corrections.

The system being fixed and tested for 'small' USB converter bugs:


There you go, the game works perfectly. Maybe I'll make a little video, but before that, I'd have to improve at this game where I'm particularly bad!


Champagne: first time I run a 'real' game on my 'own' computer!
Little video of the game. It's obvious, I'm not an inter galactic champion ;-)


Small note anyway. You have to know a lot of little things to successfully operate such a system. Nothing complicated but the documentation is fragmented. You often have to try to put the pieces together to understand how it all works. This is what I 'reproach' the most to this type of system. Too bad, because it's really fun to work with.

UPDATE 03-07-2023

As I have to perform various tests on several games in order to fine-tune the operation of the USB keyboard converter, I realized that this requires somewhat tedious cartridge loading manipulations. I am therefore in the process of preparing a somewhat particular type of cartridge which will be very easy and quick to use. I say no more for the moment. If you are interested in a simple and easily reloadable cartridge, let me know in the comments, indicating a price that seems 'reasonable' to you.

mercredi 4 janvier 2023

Kitchenaid coffee grinder repair : thank you China

Unusual article on my blog, it's true, but as I enjoy troubleshooting well-built devices that seem to be repairable, I'm sharing it here.

In fact, because the media space on the subject of sustainable development is inversely proportional to the possibilities of real reparations. The main objective being display rather than reality, particularly in France which excels in the art of lying! So, a kind of denunciation here...

I have had this excellent coffee grinder for more than ten years:


Over the past few days, a pungent-smelling puff of smoke has escaped from the engine compartment.

Dismantling the device is very easy. I removed the electric motor and could see that the smell was indeed coming from this motor. I checked the 'coals' to see if they were not worn. They were, but there was enough left to keep the engine running smoothly.

I therefore concluded that there must be a problem with the winding. I have not tried to start this engine again. When it has smoked, it is better to replace it, it is much less risky.

Here is the motor :

Nothing special, it is a motor that operates under 230V DC. I thought it was not going to be very difficult to find its new equivalent. In fact, I was wrong. It was not easy to find a new model!

KitchenAid's after-sales service for Europe is located in Belgium. So I called this service, and on the phone, I had a lady who told me that the coffee grinder model was so old, that she couldn't find the motor reference.

The only thing she could do was give me the phone number of a French after-sales service company affiliated with KitchenAid.

I suspected that she was getting rid of the problem with diplomacy. I still called this company, which was of course, unable to help me.

Important information. I have concluded from calling this service company that if your KitcheAid appliance is not under warranty, the effort to find a repair solution will be non-existent.

So: the repairability of KitcheAid devices is only guaranteed for a period of two years! After this time, if the part is no longer in stock, it's dead! This is absolutely unacceptable. A period of ten years should be possible, given the quality of construction of this type of device. Mine must be approaching fifteen years, I understand, but still: two years!!!

So what to do? Thanks China!

It is not easy at all to find this type of engine reference. In fact, I ended up finding a site that presented an engine whose images corresponded exactly to the one I had to replace. Needless to say that I greatly prefer to rely on real references, but impossible on this engine. So I had to rely on the images shown and ordered the motor while mentally preparing myself for this not being the right reference.

But hey, the price of the engine plus shipping was €39.2: not very risky.

And this morning, a very good surprise was in my mailbox :


On the left, the old engine, on the right, the new one.

From this point, I removed the drive gear from the old motor, as well as the power connector, which I placed on the new motor :


Once that was done, all that was left to do was reassemble the coffee grinder with the new motor, which is very easy to do:


If I count the time it took me to disassemble and reassemble the device, it must have taken me about an hour and a half. I took my time cleaning the entire grinder when reassembling. If I had to invoice my time, it would have cost around €30 or €60 (€30*2) if it had been done by a company. By adding the €30 of the engine, it would have normally cost me less than €100. 


The company would obviously have charged the repair as close as possible to €200. Which, for a person who knows nothing about it, is profitable compared to the €300 that this new machine costs today. (knowing that in any case, even this type of grinder in new condition is no longer repairable since the engine is no longer available in the field of standard maintenance, but that, nobody knows...).

Conclusion: the repair cost me less than €40, which represents less than 7.5% of the price of a new machine. It's a very good deal. It didn't take me long for the repair. However, in the future, I will avoid buying this type of brand which makes a good product but unfortunately at the operating cost which is potentially far too risky.

About China: obviously, my approach is not at all in line with the objective of finance, namely to produce at the lowest possible price and impose the highest possible selling price while requiring replacement as often as possible. Yet this is the image that the standard citizen has of China. Personally, I don't have this image. For me, it is a country that can also produce very good products, I use GoWin FPGAs for example, and which also has such a huge stock of parts that it is often possible to find parts there spares unavailable in the West. 

China has become an important country on the international scene. This displeases in the United States, but hey, it's the game! China is a bit too much of a dictatorship, but hey (again), are western countries really democracies? Hum... I have some doubts here...


lundi 5 décembre 2022

Minimalist computing, PLC with an STM32.

Finding a PLC that is relatively simple to use and above all, affordable and also easily expandable is not that easy.

You can use hardware based on Arduino, which costs about a third of what a standard industrial type PLC costs, or use an industrial PLC. The prices range according to the solutions adopted from €300 to €1,200 in Europe, at the end of 2022.

More troublesome, programming software is more or less proprietary and more or less flexible. An Arduino solution will always be more flexible than an OEM solution because you can access CPU resources. What industrial solutions prohibit. but Controllino type boxes are not easy to obtain, especially where I live. It is therefore difficult to offer a finished product in this format.

In fact, and this is my case, if I want to develop specific solutions, neither of the two previously mentioned worlds, Arduino or Industrial, allow me to shape a finished product. I am forced to be dependent on higher layers. From an economic point of view, these upper layers capture most of the added value by producing the least effort because none of these upper layers is in contact with the ground.

To be able to offer specific solutions and at the same time capture the maximum revenue, there are not many solutions. You have to master everything, the hardware, the software and the knowledge that will allow you to do something different but relatively profitable.

Let's go back to the late 80s. PLC standards were not yet established as they are today. So there was some design freedom. Most of the small companies then worked on the VME bus. The advantage was that it was enough to make a printed circuit board and a small front panel to be able to offer a processor or input/output card adapted to the customer's needs.

In fact my basic training allowed me at the time to build complete systems with 68000 processors, based on OS9. It was working very well.

Since that time, generalist manufacturers have increasingly 'closed' hardware and software, so that any personal development is made impossible. Of course, even with proprietary solutions, everything is still possible, but at what cost and with what constraints!

So I decided to create a small processor board olmost VME standard. The bus connector is not VME standard, it is useless. Why? Because an STM32 type processor has absolutely all the internal resources necessary for the development of a PLC. It is just necessary to establish high-speed serial communication links to create a high-performance system at low cost.

Compared to the resources required to create the same type of board based on MC68000, this has absolutely nothing to do in terms of complexity or processing capacity. An STM32 commonly operates at 80MHz, which is 10 times faster than an MC68000@8MHz, especially for PLCs where complex CICS instructions are not used.

So, here is the fruit of my reflections :


This board is only the processor board. It has no inputs/outputs (or almost). It is intended to be supplemented by other cards with various types of interfaces. In the spirit of VME, this allows maximum agility in the configuration of an automatic processing machine.

The result is a very simple design. The software to be used for the development of the application program will be that supplied as standard by STmicro.

In fact, anyone with some knowledge of microcontrollers and C language will be able to program this board. When I have tested it, I will publish the project files thus allowing to start writing code directly.

And in addition, this solution will therefore be open source ;-)

jeudi 10 novembre 2022

Addicted to GoWin fpga's!

It must be recognized that when one has tasted these GoWin circuits and the simplicity of the development software, it becomes very difficult to resist the urge to use them for a whole host of projects.

I had the opportunity, a few months ago, to replace an Intel FPGA-based module with a GoWin module that I made myself, in a project to rebuild the Micro-Professor MPF-1b:

Multitech - MPF-1 / MPF-1B

The result was that : 


I also use a GoWin FPGA in the final version of my MIDI switch. It works very well.
So why not continue with the recreation of an SP12? In fact at first I wanted to recreate a Drumulator. But given the work done on the subject and the little difference in fact with an SP12, I decided to go with an SP12. 

So I gathered the majority of the digital part as well as the sampling in both directions on a small FPGA-based board. 

It should look like this:


I received the circuit boards a few weeks ago and have just mounted the digital parts:


This time the FPGA system is a bit more complex since the circuit is used with some external memory circuits. In fact, the FPGA does not have enough internal memory to accommodate all of the memory associated with the SP12 processor. No room for sample memory either. Also, some of the memory must be non-volatile and this is not possible with the internal memory of the FPGA.

For the moment, I have not powered this board. I will do that in the next few days.
The next objective will consist in starting the program of an SP12 in this board.
Nice challenge!!!